* This is a guest post by Michael Troutman from LINBIT. The original blog can be found here: https://linbit.com/blog/configuring-tiered-storage-in-cloudstack-using-linstor/
One of the benefits of integrating LINSTOR®, the LINBIT® developed software-defined storage utility, with Apache CloudStack is that you can use it to compliment CloudStack’s disk offerings to provide tiered storage within CloudStack. Tiered storage just means different types of storage, for example, faster or slower storage. Having tiered storage within a system or platform gives you the flexibility to choose where you store data. For example, you might want to store frequently accessed data on faster storage and less frequently accessed data, such as backups, on slower storage. This flexibility also lets you have different storage offerings for customers depending on different product plans.
CloudStack supports tiered storage through its concept of disk offerings. By configuring different disk offerings, a CloudStack administrator has “a choice of disk size and IOPS (Quality of Service) for primary data storage.”1 LINBIT friends, ShapeBlue, posted a great blog article that further explores the topic of CloudStack disk offerings within the broader context of the different storage options within CloudStack. This blog post is essential reading if you are new to the topic or if you are interested in learning more about CloudStack’s storage options and capabilities.
LINSTOR supports tiered storage through its concepts of storage pools and resource groups. You can create storage pools in LINSTOR that have different back-end physical devices and different logical volume types on top of them, such as LVM or ZFS volumes. You can then create different LINSTOR resource groups that you can associate with different storage pools. LINSTOR resource groups serve as templates for resources that you create from them. In the case of integrating LINSTOR with CloudStack by using the LINSTOR CloudStack plugin, resources will be created automatically from resource groups when needed.
This article will show you how you can easily create different LINSTOR storage pools and resource groups, and then associate them with different CloudStack disk offerings.
Prerequisites
This article assumes that you have a CloudStack cluster and a LINSTOR cluster already set up. These clusters can share nodes if you want, they do not need to be physically (or virtually) separate clusters. You will also need to have different storage back end devices connected to your diskful LINSTOR satellite nodes. This article uses two backing devices, /dev/sdc and /dev/sdd, on each LINSTOR satellite node. You will need to use your imagination that these are actually different physical devices. For the sake of example, /dev/sdc will be faster storage, such as an NVMe drive. The /dev/sdd device will be slower storage, such as a traditional spinning magnetic hard disk drive. This is a simplistic example to get you quickly started. In a real-world deployment, the storage back end would likely be multiple devices in a RAID configuration, either for redundancy or performance reasons, or both. However, the underlying concepts and commands in this article will be the same whether your storage pool is backed by a single device or multiple devices in a RAID configuration.
In this article, the example CloudStack and LINSTOR cluster consists of four nodes: cloudstack-0 through cloudstack-3. The cloudstack-0 node runs the CloudStack installation and is also the LINSTOR controller node. This node also runs the LINSTOR client software. The remaining three nodes are LINSTOR satellite nodes.
Setting Up Tiered Storage Using LINSTOR
Configuring tiered storage in LINSTOR for this use case involves creating a different storage pool for each backing device, /dev/sdc and /dev/sdd, on each LINSTOR satellite node and then creating different resource groups that are backed by the different storage pools.
Creating LINSTOR Storage Pools
To create a thin-provisioned storage pool named lvm-thin-fast backed by /dev/sdc, on the LINSTOR controller node enter the following command:
# for node in cloudstack-{1..3}; do \
linstor physical-storage create-device-pool --pool-name lvm_fastpool \
LVMTHIN $node /dev/sdc --storage-pool lvm-thin-fast; done
To create a thin-provisioned storage pool named lvm-thin-notasfast backed by /dev/sdd, on the LINSTOR controller node enter the following command:
# for node in cloudstack-{1..3}; do \
linstor physical-storage create-device-pool --pool-name lvm_notasfastpool \
LVMTHIN $node /dev/sdd --storage-pool lvm-thin-notasfast; done
NOTE: The choice of using an LVM thin-provisioned storage as a back end for these storage pools is for example only. You might also choose thick-provisioned LVM, or thin or thick-provisioned ZFS as back ends, depending on your needs.
Resource Groups
Next, create two LINSTOR resource groups, one for each of the storage pools that you just created.
On your LINSTOR controller node, enter the following commands:
# linstor resource-group create my_fast_group \
--storage-pool lvm-thin-fast \
--place-count 2
# linstor resource-group create my_notasfast_group \
--storage-pool lvm-thin-notasfast \
--place-count 2
Specifying a placement count of two ensures that LINSTOR will automatically place and maintain two copies of any resources created from the resource group on diskful nodes in the cluster. On any remaining LINSTOR satellite nodes in the cluster, LINSTOR will place a diskless copy of the resource.
Enter a linstor resource-group list command and output will show your two newly created resource groups:
╭────────────────────────────────────────────────────────────────────────────────╮
┊ ResourceGroup      ┊ SelectFilter                       ┊ VlmNrs ┊ Description ┊
╞════════════════════════════════════════════════════════════════════════════════╡
[...]
╞┄┄┄┄┄┄┄┄┄┄┄┄┄┄┄┄┄┄┄┄┄┄┄┄┄┄┄┄┄┄┄┄┄┄┄┄┄┄┄┄┄┄┄┄┄┄┄┄┄┄┄┄┄┄┄┄┄┄┄┄┄┄┄┄┄┄┄┄┄┄┄┄┄┄┄┄┄┄┄┄╡
┊ my_fast_group      ┊ PlaceCount: 2                      ┊        ┊             ┊
┊                    ┊ StoragePool(s): lvm-thin-fast      ┊        ┊             ┊
╞┄┄┄┄┄┄┄┄┄┄┄┄┄┄┄┄┄┄┄┄┄┄┄┄┄┄┄┄┄┄┄┄┄┄┄┄┄┄┄┄┄┄┄┄┄┄┄┄┄┄┄┄┄┄┄┄┄┄┄┄┄┄┄┄┄┄┄┄┄┄┄┄┄┄┄┄┄┄┄┄╡
┊ my_notasfast_group ┊ PlaceCount: 2                      ┊        ┊             ┊
┊                    ┊ StoragePool(s): lvm-thin-notasfast ┊        ┊             ┊
╰────────────────────────────────────────────────────────────────────────────────╯
Creating Primary Storage in CloudStack
To create new primary storage in CloudStack, backed by your new LINSTOR storage pools, navigate to the CloudStack web interface (http://cloudstack-0:8008, in this example) and log in as an administrator.
Next, click the “Primary storage” item from within the “Infrastructure” left menu list. Then, click the “Add primary storage” button.
Creating Fast Primary Storage
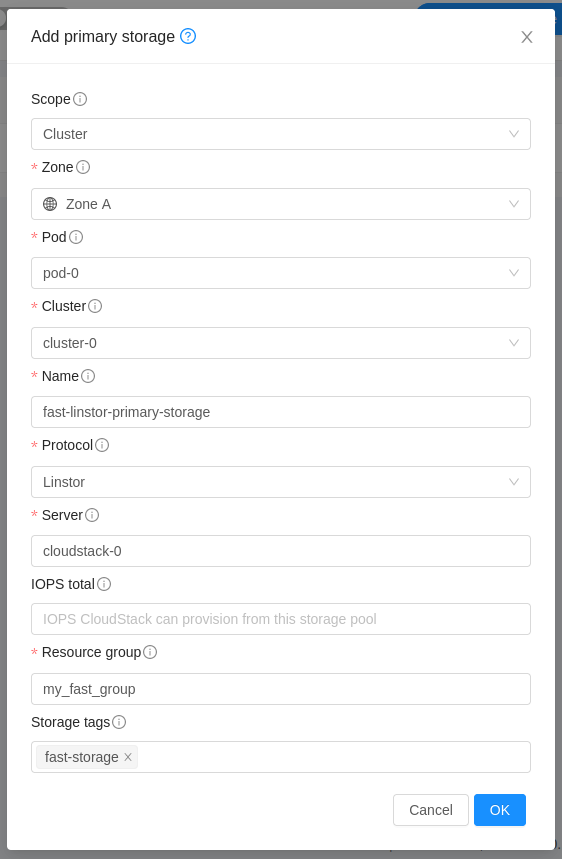
To create primary storage backed by your “fast” LINSTOR storage pool, complete the fields as shown in the screen grab. Replace the server address shown, cloudstack-0, to match the LINSTOR controller node hostname or IP address in your environment.

Creating Not As Fast Primary Storage
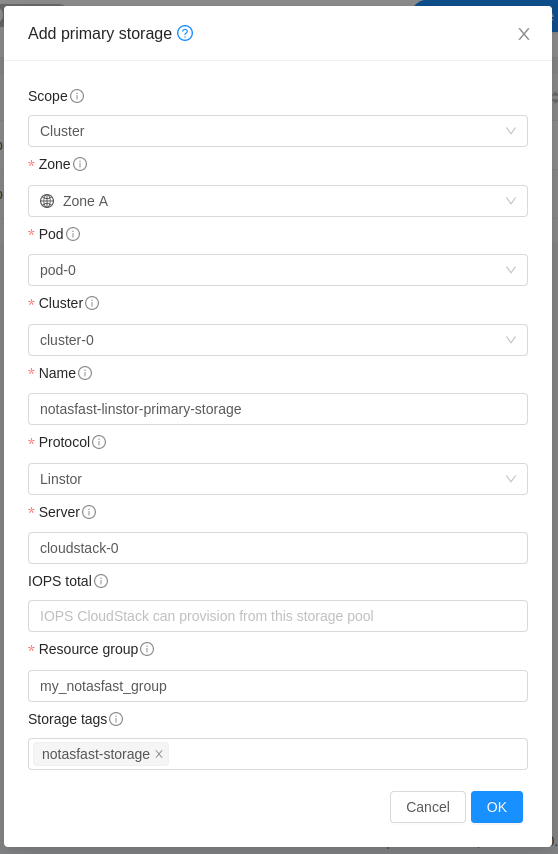
To create primary storage backed by your “not as fast” LINSTOR storage pool, complete the fields as shown in the screen grab. Again, replace the server address shown, cloudstack-0, to match the LINSTOR controller node hostname or IP address in your environment.

When you create primary storage in CloudStack, the key to being able to link the primary storage that you create with CloudStack disk offerings is the “storage tags” field.
Setting Up Disk Offerings in CloudStack
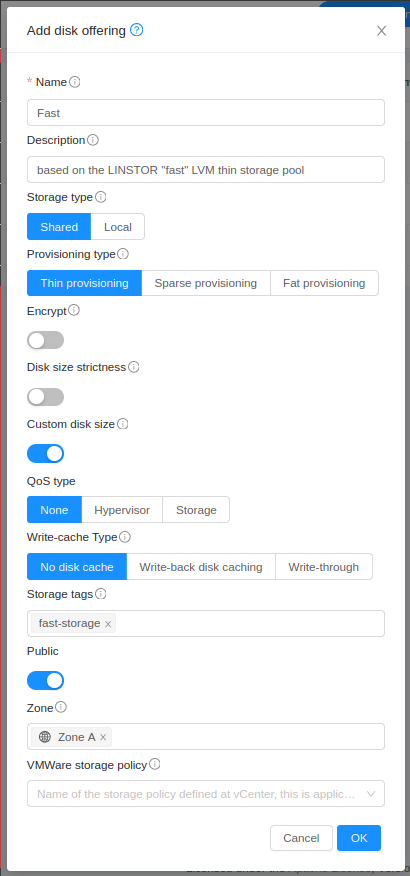
After creating your different CloudStack primary storage, next create a disk offering based on each primary storage. To do this, click the “Disk offerings” item within the “Service offerings” left menu list. Next, click the “Add disk offering” button.
Complete the fields as shown in the screen grab to create a “fast” disk offering.

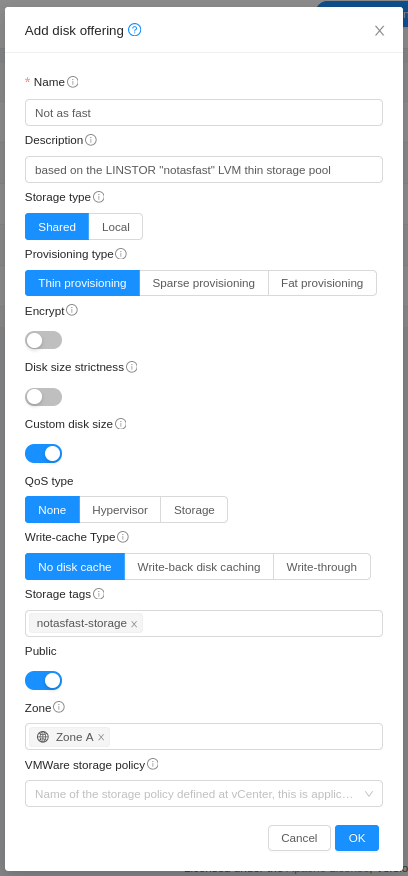
Next, click the “Add disk offering” button again and complete the fields as shown in the screen grab to create a “not as fast” disk offering.

QoS Settings
While this simplistic example did not configure them, you could, if you wanted to, configure some basic quality of service (QoS) for your disk offerings. You can do this at the CloudStack level by clicking either the hypervisor or the storage selector under the “QoS type” field when you add a disk offering.
If you select the storage QoS type, then you can specify minimum and maximum IOPS for the disk offering. You must also configure an “IOPS total” number when you configure your CloudStack primary storage. When CloudStack provisions new resources from the disk offering, the “Max IOPS” number that you configured for the disk offering will be subtracted from the “IOPS total” number that you configured for the primary storage associated with the disk offering.
To arrive at reasonable IOPS numbers to use for your primary storage and for your disk offerings, you will need to do some benchmarking. A utility such as Fio can help you benchmark.
LINBIT solutions architects have written blog posts about benchmarking LINSTOR and DRBD® if you want to get some general ideas about the process:
As a service provider, configuring QoS for your disk offerings might be a further way that you can have tiered offerings for the deployment options that you offer your customers. Or it can simply be a way that you can ensure performance levels for your storage, for internal reasons.
Conclusion
Having support for tiered storage is important because it gives you flexibility. You have the flexibility to use different storage types, for example, slower or faster, for different workloads. You also have the flexibility to use tiered storage as the basis for different product plans that you can offer your customers, for example, if you are a virtual private server (VPS) service provider. Thankfully, configuring tiered storage in CloudStack using LINSTOR and the LINSTOR CloudStack storage plugin is easy to do.
If you are interested in evaluating LINSTOR for your CloudStack deployment, or if you have questions about how you might use or configure LINSTOR for your specific needs, reach out to the LINBIT team or join us and the community of LINBIT software users in the LINBIT community forums. CloudStack also has documentation which you can find hosted on the Apache Software Foundation website.


